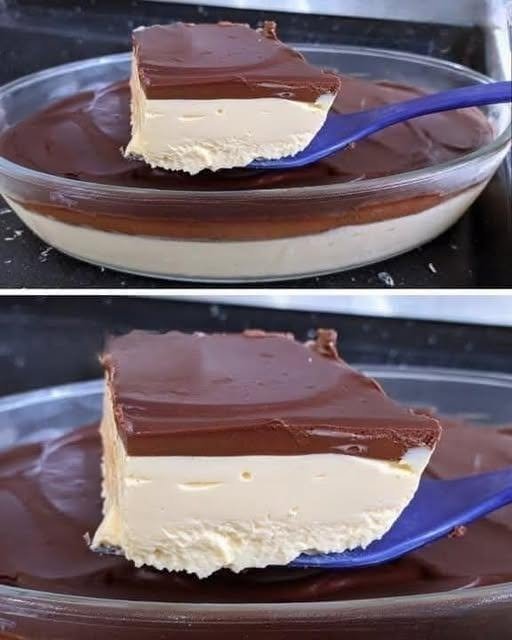
2. The Chocolate Silk Layer
|
Ingredient
|
Why It Works
|
|---|---|
|
½ cup unsweetened cocoa powder (or ¾ cup sugar-free dark chocolate chips)
|
Cocoa powder gives a deep, bakery-style chocolate flavor without added oils. Chips melt smoother but check labels for hidden dairy/sugar.
|
|
½ cup coconut cream (or ¼ cup coconut oil + ¼ cup almond milk)
|
Creates that glossy, pourable ganache that sets into a silky snap.
|
|
2–3 tbsp powdered keto sweetener (adjust to taste)
|
Cocoa is naturally bitter; this balances it without spiking carbs.
|
|
½ tsp vanilla extract + pinch of salt
|
Rounds out the chocolate and mimics premium dessert bar flavor.
|
|
Flaky sea salt (for garnish)
|
Optional but highly recommended for that sweet-salty contrast.
|
📝 Step-by-Step Instructions (15 Minutes Active + Chill Time)
Step 1: Prep the Pan
- Line an 8×8-inch baking pan with parchment paper, leaving overhang on two sides for easy lifting later.
Step 2: Make the Creamy Base
- Drain and rinse your soaked nuts. Pat dry.
- Add nuts, coconut cream, powdered sweetener, vanilla, salt, and coconut oil (if using) to a high-speed blender or food processor.
- Blend 2–4 minutes until completely smooth, creamy, and free of grit. Scrape down sides as needed.
- Pour into the prepared pan. Use a spatula or damp hands to press evenly into a compact layer.
- Chill 30–45 minutes until firm to the touch.
Step 3: Create the Chocolate Silk Layer
- In a small saucepan over low heat (or in 30-second microwave bursts), gently warm the coconut cream (or coconut oil + almond milk) until just melted.
- Whisk in cocoa powder, sweetener, vanilla, and salt until completely smooth and glossy. No lumps!
- Let cool 2–3 minutes (it should be pourable but not hot).
- Pour evenly over the chilled base. Tilt pan gently to spread.
- Sprinkle with flaky sea salt if desired.
Step 4: Set & Slice
- Freeze 2 hours (or refrigerate 4 hours) until completely firm.
- Lift out using parchment overhang. Slice with a warm, dry knife (wipe between cuts for clean edges).
- Serve immediately or store (see below).
💡 Pro Tips for Perfect Texture Every Time
- Powder your sweetener: If your keto sweetener is granular, pulse it in a clean coffee grinder or blender until fine. Grainy sweetener = gritty bars.
- Don’t skip the soak: Unsoaked cashews will leave a sandy texture. Macadamias soften faster but still benefit from a 1-hour soak.
- Keep it cold: Coconut-based desserts soften quickly at room temp. Slice and return to fridge/freezer within 15 minutes.
- Blender matters: A high-speed blender (Vitamix, Blendtec) gives the silkiest result. Food processors work but may leave a slightly grainier base.
- Taste before pouring: Adjust sweetener in the chocolate layer before it sets. It’s easier to fix now than after!
📦 Storage & Serving
- Fridge: Store in an airtight container up to 5 days. Texture firms slightly over time.
- Freezer: Wrap bars individually in parchment + foil. Freeze up to 2 months. Thaw 10 mins at room temp before eating.
- Serving temp: Best slightly chilled (not rock hard). Let sit 5–10 mins out of the freezer for that signature “silk” melt-in-your-mouth feel.
🔄 Easy Variations
- Peanut Butter Swirl: Swirl 2 tbsp sugar-free peanut butter into the base before chilling.
- Espresso Silk: Add ½ tsp instant espresso powder to the chocolate layer for mocha depth.
- Berry Swirl: Dollop 2 tbsp unsweetened raspberry or strawberry puree over the base before pouring chocolate.
- Nut-Free Option: Swap cashews/macadamias for sunflower seed butter + hemp hearts blended with coconut cream (texture will be slightly denser but still delicious).
❤️ Why This Recipe Works (And Why It’ll Become a Staple)
This isn’t a “diet dessert” that tastes like compromise. It’s a texture-first, flavor-forward bar that proves plant-based and low-carb don’t mean sacrificing indulgence. The base is rich, subtly sweet, and impossibly smooth. The chocolate layer cracks gently, then melts into cool, velvety silk. Kids ask for it. Keto friends celebrate it. Vegan guests don’t even realize it’s dairy-free.
And best of all? Zero oven heat. Zero dairy. Zero refined sugar. Just 15 minutes of active work and a few hours of patience.
So grab your blender, chill your coconut cream, and let the fridge do the rest. Your sweet tooth—and your macros—will thank you.
🍫 Made these? Drop your favorite variation or storage tip below. We’re all learning how to make low-carb, plant-based desserts taste like heaven together